How to Take Screenshots With Windows 10

Taking screenshots or printscreen on Windows 10 is a handy skill, whether you want to save important information, capture moments from a game, or illustrate a point in a presentation. In this guide, we’ll explore various methods to take screenshots using different laptops, how to get high-quality captures, and even how to record your screen. Let’s dive in!
1. Basic Methods to Take a Screenshot in Windows 10
Using the Print Screen (PrtScn) Key on PC
One of the most common ways to take a screenshot in Windows 10 is by using the PrtScn key on your keyboard. Here are a few methods:
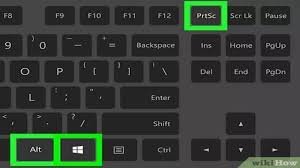
- Full-Screen Screenshot: Press the PrtScn key. This captures your entire screen and copies the image to your clipboard. You can paste it into applications like Paint or Word by pressing Ctrl + V.
- Active Window Screenshot: If you only want a screenshot of the active window, press Alt + PrtScn. This captures just the window you’re currently using.
- Automatic Save of Screenshot: To take a full-screen screenshot and automatically save it as a file, press Windows Key + PrtScn. It will be saved in the Screenshots folder within your Pictures library.
Using Snipping Tool
Snipping Tool is a built-in application on pc Windows 10 that offers more flexibility for taking screenshots. To use it:
- Search for Snipping Tool in the Start menu and open it.
- Click New to select the area of the screen you want to capture.
- After capturing, you can annotate, save, or copy the snip.
Snip & Sketch
Another useful tool is Snip & Sketch, which allows you to take screenshots more interactively:
- Press Windows Key + Shift + S to initiate a screenshot.
- Choose from options like rectangular snip, freeform snip, window snip, or full-screen snip.
- Once you’ve selected the area, it gets copied to your clipboard, and you can access it through notifications to edit or save.
2. Taking Screenshots on Different Laptops
HP Laptops
To take a screenshot on a Windows 10 HP laptop, the methods are the same as described above. Pressing Windows Key + PrtScn will still save your screenshots directly.
Samsung Laptops
For Samsung laptops, capture the screen with the same techniques. Whether using the PrtScn key or the Snipping Tool, they all work effectively.
Dell and Acer Laptops
Taking screenshots in Dell laptops and Acer laptops is no different from other brands. Just remember to use the Fn key in combination with PrtScn if your laptop requires it.
Fujitsu Laptops
To take a screenshot on a Fujitsu laptop running Windows 10, follow the same methods, using either the keyboard shortcuts or the integrated tools.
3. High-Quality Screenshots
If you’re looking to take high-quality screenshots on Windows 10, consider the following tips:
- Ensure your screen resolution is set to its highest setting for clearer images.
- Use dedicated software like Lightshot that allows for editing and saving in high quality.
4. Taking Screenshot Without PrtScn
If you need to take a screenshot in Windows 10 without using PrtScn, you still have options:
- Windows Game Bar: Open it by pressing Windows Key + G when you’re in a game or any application you wish to capture. Click on the camera icon or use Windows Key + Alt + PrtScn to capture directly.
- Snipping Tool or Snip & Sketch provides great alternatives without relying on the PrtScn key.
5. Continuous and Automatic Screenshots
For taking continuous screenshots in Windows 10, consider using software like ShareX. This tool can capture multiple screenshots in succession or allow for scrolling capture.
If you’re looking for how to take automatic screenshots in Windows 10, tools like Jing or Lightshot can be set to take screenshots at set intervals, perfect for logging long processes or monitoring.
6. Custom and Selected Area Screenshots
Need to take a custom screenshot in Windows 10? Use Snip & Sketch for great control over what you capture. Simply select the area you want, and you’ll have your custom shot ready to save or share.
For specific selections:
- Press Windows Key + Shift + S to access the snipping options and draw a rectangle around the area you want to screenshot.
7. Screen Recording on Windows 10
If you’d like to record your screen instead of just taking a screenshot, you can do this easily in Windows 10 with the Game Bar:
- Open Game Bar by pressing Windows Key + G.
- Click the record button or press Windows Key + Alt + R to start and stop recording.
This feature is particularly useful for gamers or anyone needing to create tutorials.
8. Taking Screenshots in Games
To take a screenshot on Windows 10 in a game, the Windows Game Bar is your best companion. Using Windows Key + G, you can quickly snap your gameplay without missing a beat.
9. Conclusion
Taking a screenshot on Windows 10 is a straightforward task that can be done using various methods. Whether you’re using the PrtScn key, Snipping Tool, or Game Bar, knowing these shortcuts will enhance your productivity. Feel free to experiment with the different tools to find what works best for your specific needs. Happy screenshotting!


